

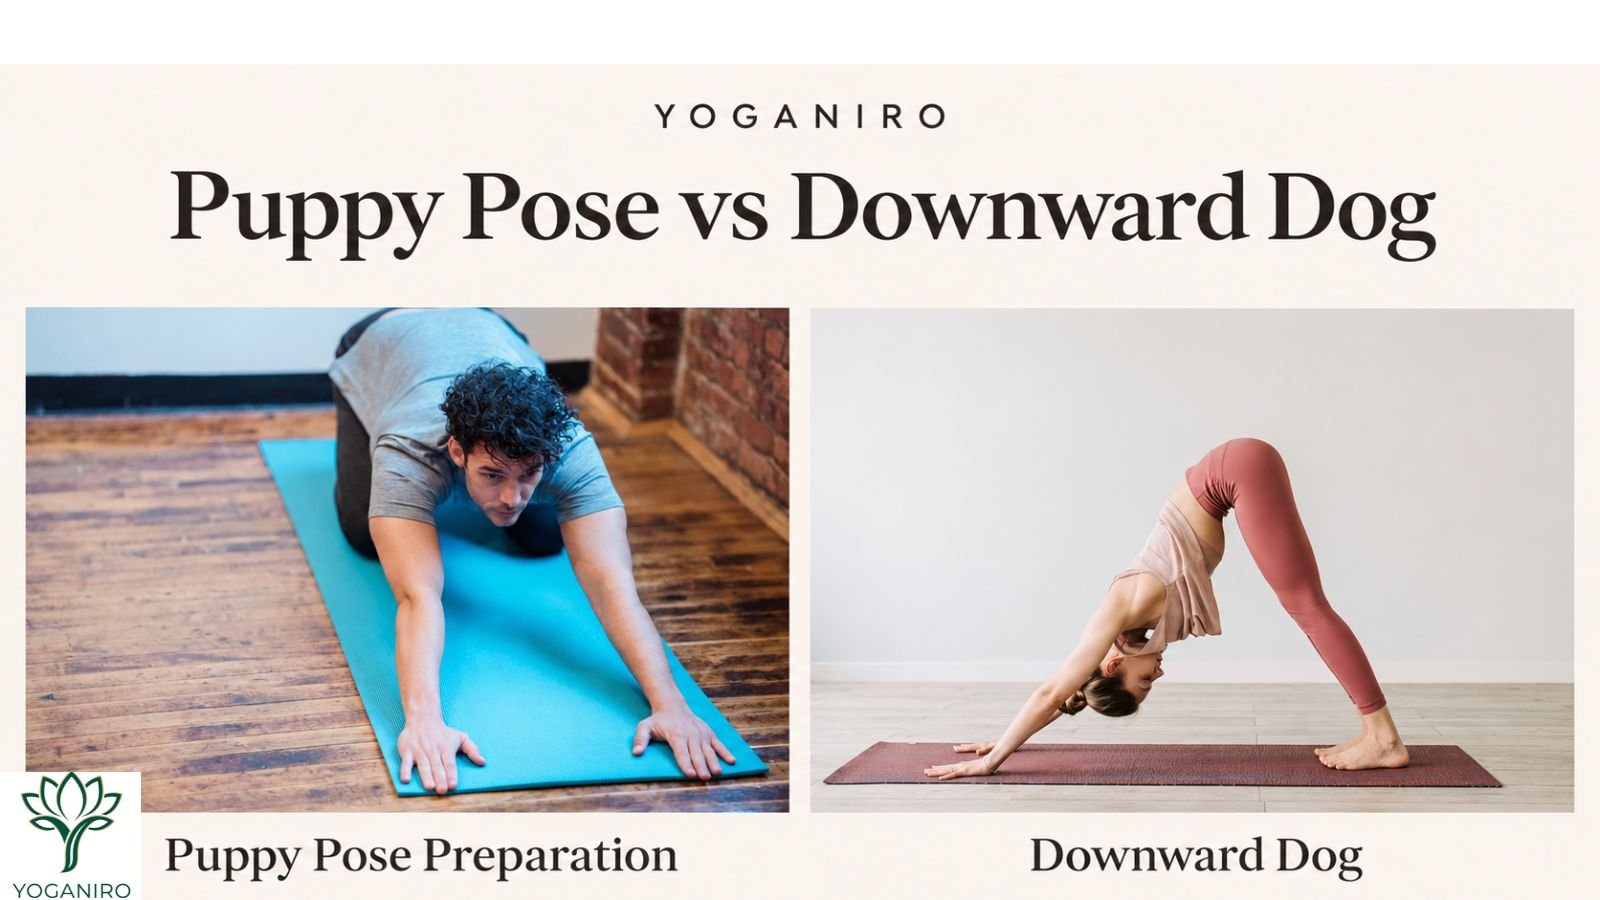
When comparing puppy pose vs downward dog, look at the knees first. Puppy Pose keeps them on the floor while your arms reach forward and your chest lowers. Downward Dog lifts the knees, bringing your body into an inverted V supported by your hands and feet.
That difference changes how you practice each pose. Puppy Pose removes the need to support yourself through standing legs, but its shoulder stretch can still feel demanding. Downward Dog asks your arms and legs to work together, and you can keep your knees bent throughout.
Start with the version you can enter, breathe in, and leave comfortably. You do not need your chest on the floor in Puppy Pose or your heels down in Downward Dog.
Comparing puppy pose vs downward dog: Key Differences
Puppy Pose is also called Extended Puppy Pose, or Uttana Shishosana. Downward-Facing Dog is Adho Mukha Svanasana.
This guide teaches Puppy Pose with the hips approximately above the knees. Teachers may use other variations, so check which version a class is demonstrating before following along.
| What to compare | Puppy Pose | Downward Dog |
|---|---|---|
| Foundation | Knees, lower legs, and hands contact the mat | Hands and feet support the body |
| Knee position | Grounded | Lifted, with bending allowed |
| Hip position | Approximately above the knees | Lifted up and back |
| Main movement | Reaching forward while controlling the chest’s descent | Pressing through the hands while moving the hips back |
| Leg involvement | Legs remain in a kneeling position | Legs help support the position |
| Useful adjustment | Shorter reach or forehead support | Bent knees or hands against a wall |
Puppy Pose lets you explore overhead reaching while kneeling. Downward Dog combines reaching with supporting your body through your arms and legs. Neither position has to look deep to serve a useful purpose.
Which Pose Should You Try First?
Choose according to the movement you want to explore and the position you can manage today.
When Puppy Pose May Fit Your Practice
Puppy Pose may be worth exploring when kneeling is comfortable and you want to practice reaching your arms forward without lifting your knees.
However, keeping the knees down does not remove the shoulder demand. If overhead reaching already feels restricted, lowering the chest farther may make the position feel more intense.
Start with a short reach. Give yourself room to decide whether you want to continue instead of immediately reaching toward the far end of your mat.
When Downward Dog May Fit Your Practice
Downward Dog may fit when you want to practice supporting yourself through your hands and feet or become more familiar with a position used in yoga flows.
Difficulty straightening your legs is not a reason to abandon it. A bent-knee version is still Downward Dog.
Also, you do not have to experience the pose as restful simply because a teacher calls it a resting position. You can lower your knees whenever you need a break.
When a Supported Preparation Makes More Sense
Use the preparation that addresses your actual difficulty:
| Your main concern | A starting option |
|---|---|
| Your forehead does not comfortably reach the mat in Puppy Pose | Use stable forehead support and shorten the reach |
| Your legs feel restricted in Downward Dog | Keep your knees bent and your heels lifted |
| Getting onto the floor is difficult | Explore a standing wall preparation |
| Kneeling feels uncomfortable | Consider a standing option rather than forcing pressure through the knees |
| Your arms tire quickly | Shorten the attempt and rest between repetitions |
| A position causes pain | Stop and seek help choosing an appropriate adaptation |
These are starting options, not guarantees that a variation will suit an injury.
Before You Practice
Choose a clear space where your mat lies flat. Check that neither the mat nor your hands slide as you begin moving. If the surface is unstable, our guide to troubleshooting a yoga mat that slips on carpet can help you distinguish a moving mat from slippery hand contact.
Keep a folded blanket nearby for knee padding and an optional yoga block for forehead support. Arrange props before entering the pose.
Begin with familiar, comfortable movement rather than immediately holding a deep stretch. Gentle shoulder movements and small movements on hands and knees can help you notice how you feel that day.
Stop for sharp pain, joint pinching, numbness, tingling, or dizziness. Existing injuries, recent surgery, pregnancy, and some health conditions may require individual modifications. The National Center for Complementary and Integrative Health’s yoga safety guidance recommends appropriate instruction and adaptations for individual needs. www.nccih.nih.gov
If you have glaucoma, significant blood pressure concerns, or instructions to avoid head-down exercise, ask your healthcare professional which positions are appropriate.
The labels below—supported preparation and standard floor version—describe the setup. They are not universal difficulty ratings.
How to Do Puppy Pose
Supported Preparation: Shorter Reach and Forehead Support
Start on hands and knees. Position a block on its broadest face in front of you, where your forehead can meet it as you reach forward. Use a firm folded blanket if a smaller amount of support is enough.
Walk your hands forward a little at a time. Keep your hips approximately above your knees and lower only enough to rest your forehead comfortably. Leave your nose and mouth clear.
If reaching the support still requires strain, come back up and adjust its position or your reach. To finish, walk your hands back underneath your shoulders.
For help understanding prop dimensions, see our guide to choosing between 3-inch and 4-inch yoga blocks.
Supporting your forehead is different from raising your elbows on blocks. Yoga Journal describes elbow elevation as a deeper shoulder-opening variation, so it should not automatically be treated as easier. www.yogajournal.com
Standard Floor Version: Step-by-Step Instructions
- Begin in tabletop. Place your hands beneath your shoulders and your knees about hip-width apart.
- Settle your legs. Keep your hips above your knees and rest the tops of your feet on the mat.
- Walk your hands forward. Move gradually while maintaining the position of your hips.
- Lower your chest comfortably. Reach through your arms without dropping suddenly toward the floor.
- Keep your neck at ease. Let your forehead meet the mat or support if it reaches comfortably. Avoid lifting your chin to force contact.
- Maintain active arms and natural breathing. Keep a little support through your torso rather than allowing your lower back to sink excessively.
- Return to tabletop. Lift your head as needed and walk your hands back toward your shoulders.
This hips-over-knees setup follows Yoga Journal’s Extended Puppy Pose instructions. www.yogajournal.com
For an initial attempt, try two or three comfortable breaths, or less. That is a practice suggestion, not a required hold or a researched treatment program.
How to Do Downward Dog
Wall Preparation: Learn the Hip Movement
A wall preparation lets you explore moving your hips away from your hands while remaining on your feet.
- Face a clear, solid wall.
- Place your palms against it around shoulder height and shoulder-width apart.
- Take small steps backward.
- Soften your knees and hinge at your hips.
- Adjust your hand height so your arms and back can reach comfortably.
- Keep your head in line with your upper body.
- Walk toward the wall and return upright before releasing your hands.
Your torso does not need to become parallel to the floor. A small hinge is enough to begin learning the movement.
Cleveland Clinic’s Downward Dog guide includes a standing wall adaptation and emphasizes finding a comfortable range. health.clevelandclinic.org
Floor Version: Start With Bent Knees
- Begin on hands and knees. Position your hands slightly ahead of your shoulders.
- Establish hand contact. Spread your fingers comfortably and press through your palms and finger bases.
- Tuck your toes. Prepare to lift without rushing.
- Lift your knees. Send your hips up and back while keeping your knees bent.
- Press the mat away. Let your head remain between your upper arms without looking forward.
- Adjust your legs. Straighten them only as far as comfortable. Your heels may stay lifted.
- Come down with control. Bend your knees and lower them to the mat, returning to tabletop.
Yoga Journal’s Downward-Facing Dog instructions also use a bent-knee entry and allow the heels to remain off the floor. www.yogajournal.com
Try a brief hold before deciding whether to repeat. Finishing while you can lower smoothly is more useful than staying until your arms feel exhausted.
Common Mistakes and What to Try Instead
| What you notice | What to try |
|---|---|
| You force your chest lower in Puppy Pose | Shorten your reach and keep the movement smaller |
| The Puppy stretch feels concentrated in your lower back | Come up slightly and reduce the chest drop |
| You lift your chin to make contact with the floor | Use forehead support or remain higher |
| Your back rounds as you straighten your legs in Downward Dog | Bend your knees and reassess the position |
| You keep moving your feet just to lower your heels | Allow lifted heels and prioritize steady support |
| You hold your breath to stay longer | End the attempt and use a shorter hold next time |
| You rush or drop out of the pose | Practice the exit separately and finish earlier |
Change one thing at a time. For example, adjust your knee bend before changing your hand position. That makes it easier to notice which adjustment helped.
When exploring puppy pose vs downward dog, pay attention to the return as well as the hold. Being able to leave steadily is part of practicing the movement.
Can Puppy Pose Replace Downward Dog in a Class?
Sometimes, but the next movement matters.
If the class pauses in Downward Dog, you may have time to lower your knees and explore Puppy Pose. If the teacher immediately asks you to step a foot forward, Puppy leaves you in a different starting position.
For a deliberate switch:
- From Downward Dog, lower your knees to tabletop.
- Arrange your feet and any support.
- Walk your hands forward into your chosen Puppy variation.
- To finish, walk your hands back to tabletop.
- From there, decide whether to rejoin the sequence or rest.
Avoid lifting directly into Downward Dog from a deep Puppy position. Reset your hands and legs first.
You can also ask your teacher, “Where should I rejoin if I rest during Downward Dog?” That gives you a plan for the whole transition.
Frequently Asked Questions
Is Puppy Pose the Same as Child’s Pose?
No. In the Puppy Pose version taught here, your hips remain approximately above your knees. In Child’s Pose, your hips move back toward your heels.
Both involve kneeling, but they place your body differently. One is not automatically a comfortable alternative to the other.
Is Puppy Pose the Same as Dolphin Pose?
No. Standard Dolphin Pose uses the forearms as part of the foundation and lifts the knees. Puppy Pose keeps the knees grounded while the arms reach forward.
Our Dolphin vs Downward Dog comparison explains how forearm support changes the setup.
Does Puppy Pose Remove All Wrist Pressure?
No. The hands still contact the mat, and pressure depends on your position and how actively you press.
Do not assume that knees-down means wrist-free. If your wrists hurt, stop painful loading and get help choosing an appropriate alternative.
Final Thoughts
Puppy Pose and Downward Dog offer different ways to explore reaching, support, and controlled movement. Your choice can change from one practice to the next.
Start with one comfortable preparation. Learn its entry and exit, take a few easy breaths, and notice how it feels. There is no need to force floor contact or move to a deeper version before you are ready.

Yoganiro was founded by Abdul Rehman with a passion for yoga, wellness, and mindful living. The goal behind Yoganiro is to inspire people through simple yoga practices, wellness tips, and healthy lifestyle content that promotes balance, peace, and overall well-being.